How to Build a Restaurant Online Ordering System with Next.js
Build an online ordering system for a restaurant with Next.js: run the stack, add kitchens and a bilingual menu, test payments and go live.
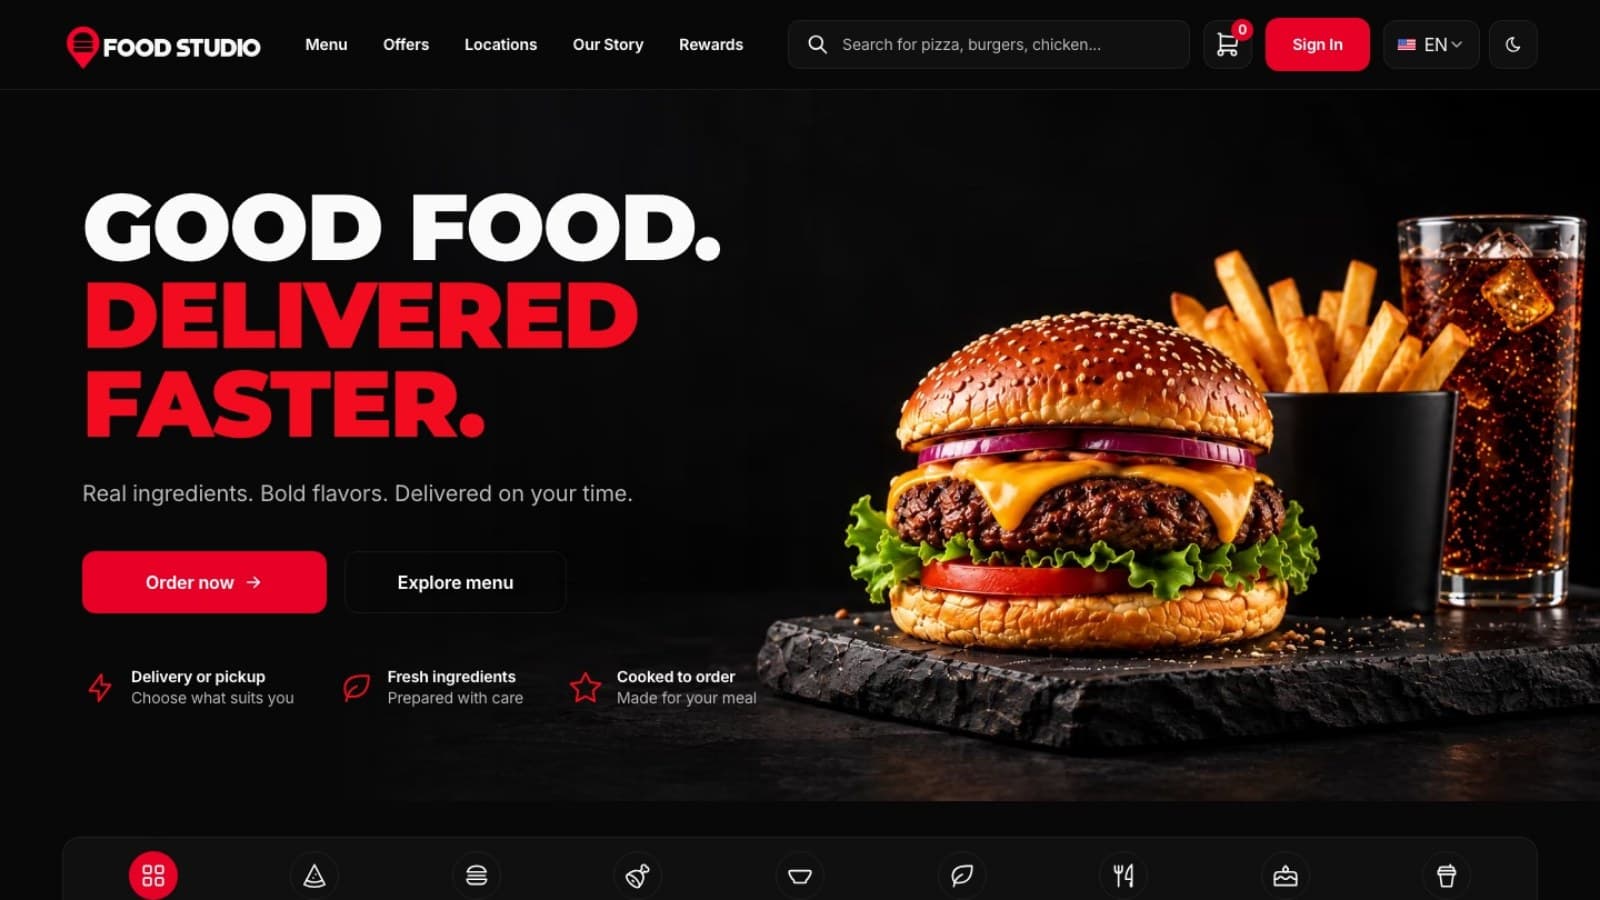
By the end of this guide you will know how to build an online ordering system for a restaurant with Next.js: a public ordering website, a back office for the kitchen and the owner, and an API that holds the rules. We use the Food Studio template as the starting point and walk one example restaurant from first install to a live launch.
The aim is a plan you can follow, not a feature tour. You will see what to do on day one, which settings matter before you take a real payment, and which mistakes cost the most time. The same steps work for a single restaurant, a takeaway brand with several kitchens, or a site you build for a client.
The brief
Olive Street Kitchen is a small Mediterranean takeaway with two kitchens, one in the old town and one near the station. The owner wants guests to order from a phone, pay online, and follow the order until it arrives. Here is what the project has to do:
- Show a menu that guests can search and filter by category and diet, with allergens on every dish.
- Sell a combo (a main, a side and a drink) at one price.
- Offer delivery and pickup, and only accept a delivery when the address is in a kitchen's area and the kitchen is open.
- Take card or PayPal payments without the restaurant ever handling card numbers.
- Give the kitchens a queue of paid orders, and keep prices hidden from kitchen staff.
- Work in English and Arabic, with the Arabic pages mirrored right to left.
- Let the owner change the menu and the home page without asking a developer.
How the template covers the brief
| Need | Where it lives | What you use |
|---|---|---|
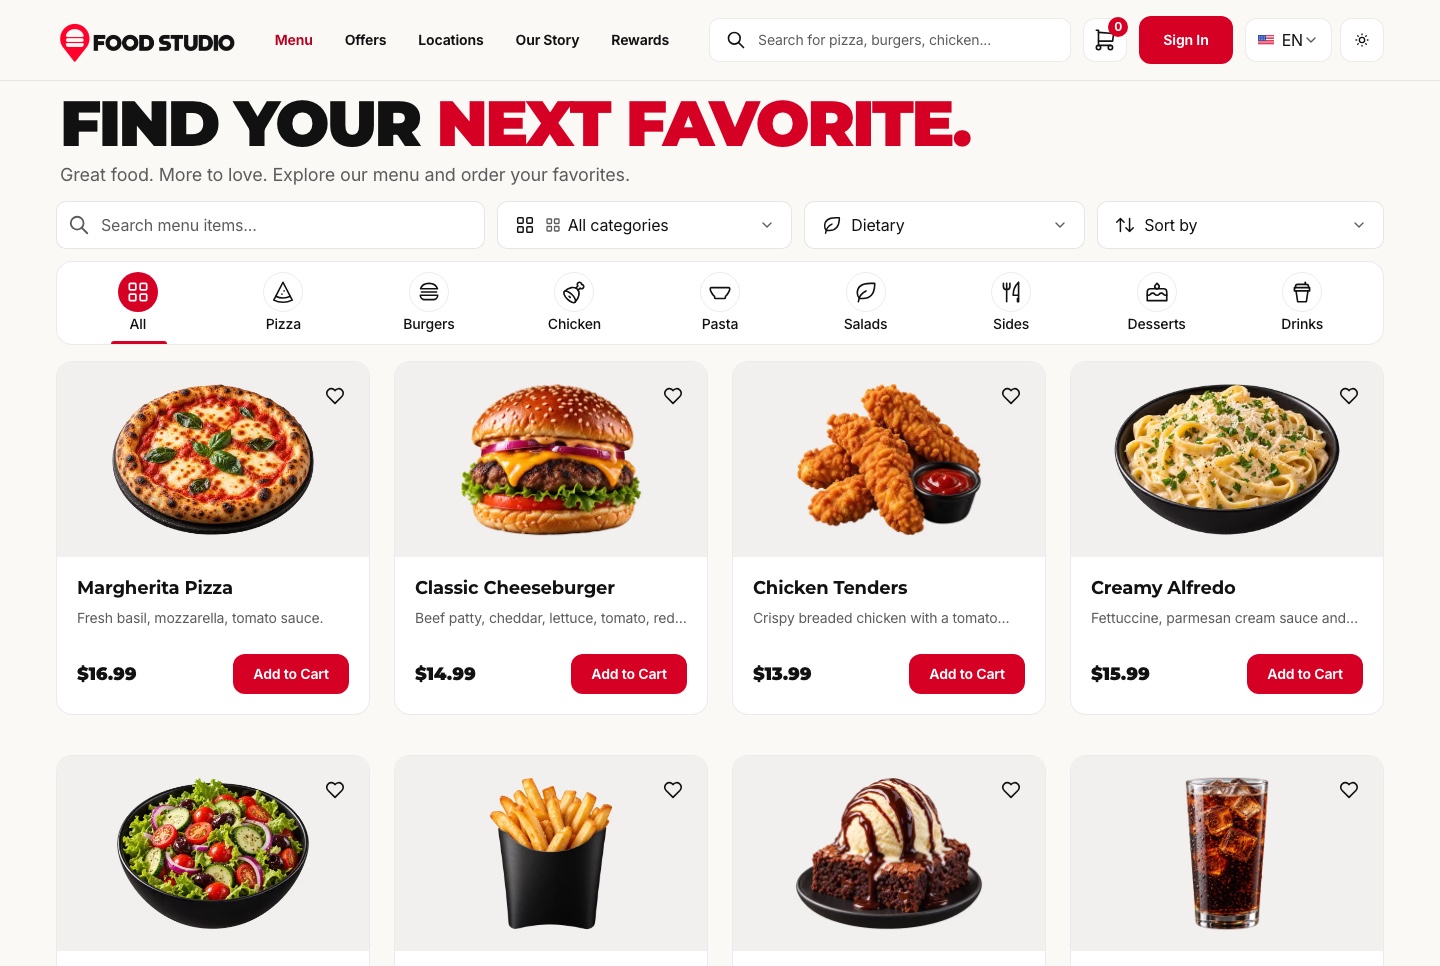
| Searchable menu with allergens | Ordering website | The menu page at /en/shop, and the dish editor in the dashboard |
| Combo at one price | Website and dashboard | The combo page, and the combo offer and meal builder sections of the home page |
| Delivery rules per kitchen | API and dashboard | Settings, Restaurant: kitchens, hours, delivery postcodes, fees and minimum order |
| Online payment | API | Stripe or PayPal keys and webhooks in the API's .env file |
| Kitchen queue without prices | Dashboard | Team page, the kitchen role tied to one kitchen |
| English and Arabic with RTL | All three apps | /en and /ar routes, the messages folders, a bilingual dish editor |
| Owner edits the home page | Dashboard | Homepage, nine sections you switch, reorder and edit |
Before you start: decisions to make
Most delays in a project like this come from decisions nobody made early. Settle these before you open a terminal.
- Which package. A single-app package needs an API running somewhere, so choose one only if you already have it.
- Where it runs. You need a Node host for three apps, a database (SQLite on a persistent disk, or MySQL) and a place for uploads (a persistent folder or a bucket such as Cloudflare R2).
- Which languages. Every dish is stored in English and Arabic, so someone has to write or check each Arabic name and description before launch.
- Which payment providers. Stripe, PayPal or both, on accounts that belong to the restaurant. Tips, tax lines and cash on delivery are not included.
- Kitchens and delivery areas. Each kitchen needs an address, hours, a time zone, a preparation time and its delivery postcodes. Gather them on one sheet.
- Who runs the dashboard. Decide the owner, the managers and one kitchen account per kitchen.
- How guests hear about an order. There are no order confirmation emails, so guests rely on the tracking page. Decide whether that is enough for the first month.
Step by step
Step 1: Choose the package
Food Studio is sold as one full-stack template and also as separate pieces: the ordering website, the staff dashboard and the backend API. The website and the dashboard have no data of their own. They read everything from the API, so a website or dashboard package alone needs an API running somewhere.
For a new restaurant, take the Full Stack package. It holds all three apps, the database setup and the demo restaurant in one folder. If a client already has an API you trust, or you are only replacing one front end, a single package is enough. The pieces are listed on the ordering website and staff dashboard pages.
Check before moving on
You can name the ZIP you downloaded and the apps it holds. If it is a front end alone, you know where its API will run.
What usually goes wrong
A single front end shows nothing without an API, because neither app holds data of its own.
Step 2: Run it locally with Docker
Install Docker Desktop (or Docker Engine with Compose), download the ZIP from My templates, unzip it and open a terminal in the food-studio-full-stack folder. Then start everything with one command:
docker compose up --buildNothing needs configuring first. The first run builds three images and loads a demo restaurant, so allow a few minutes. When it settles, you have three apps:
- The ordering website at
http://localhost:3030(Arabic at/ar). - The staff dashboard at
http://localhost:3031. - The API at
http://localhost:8000, with every route under/api.
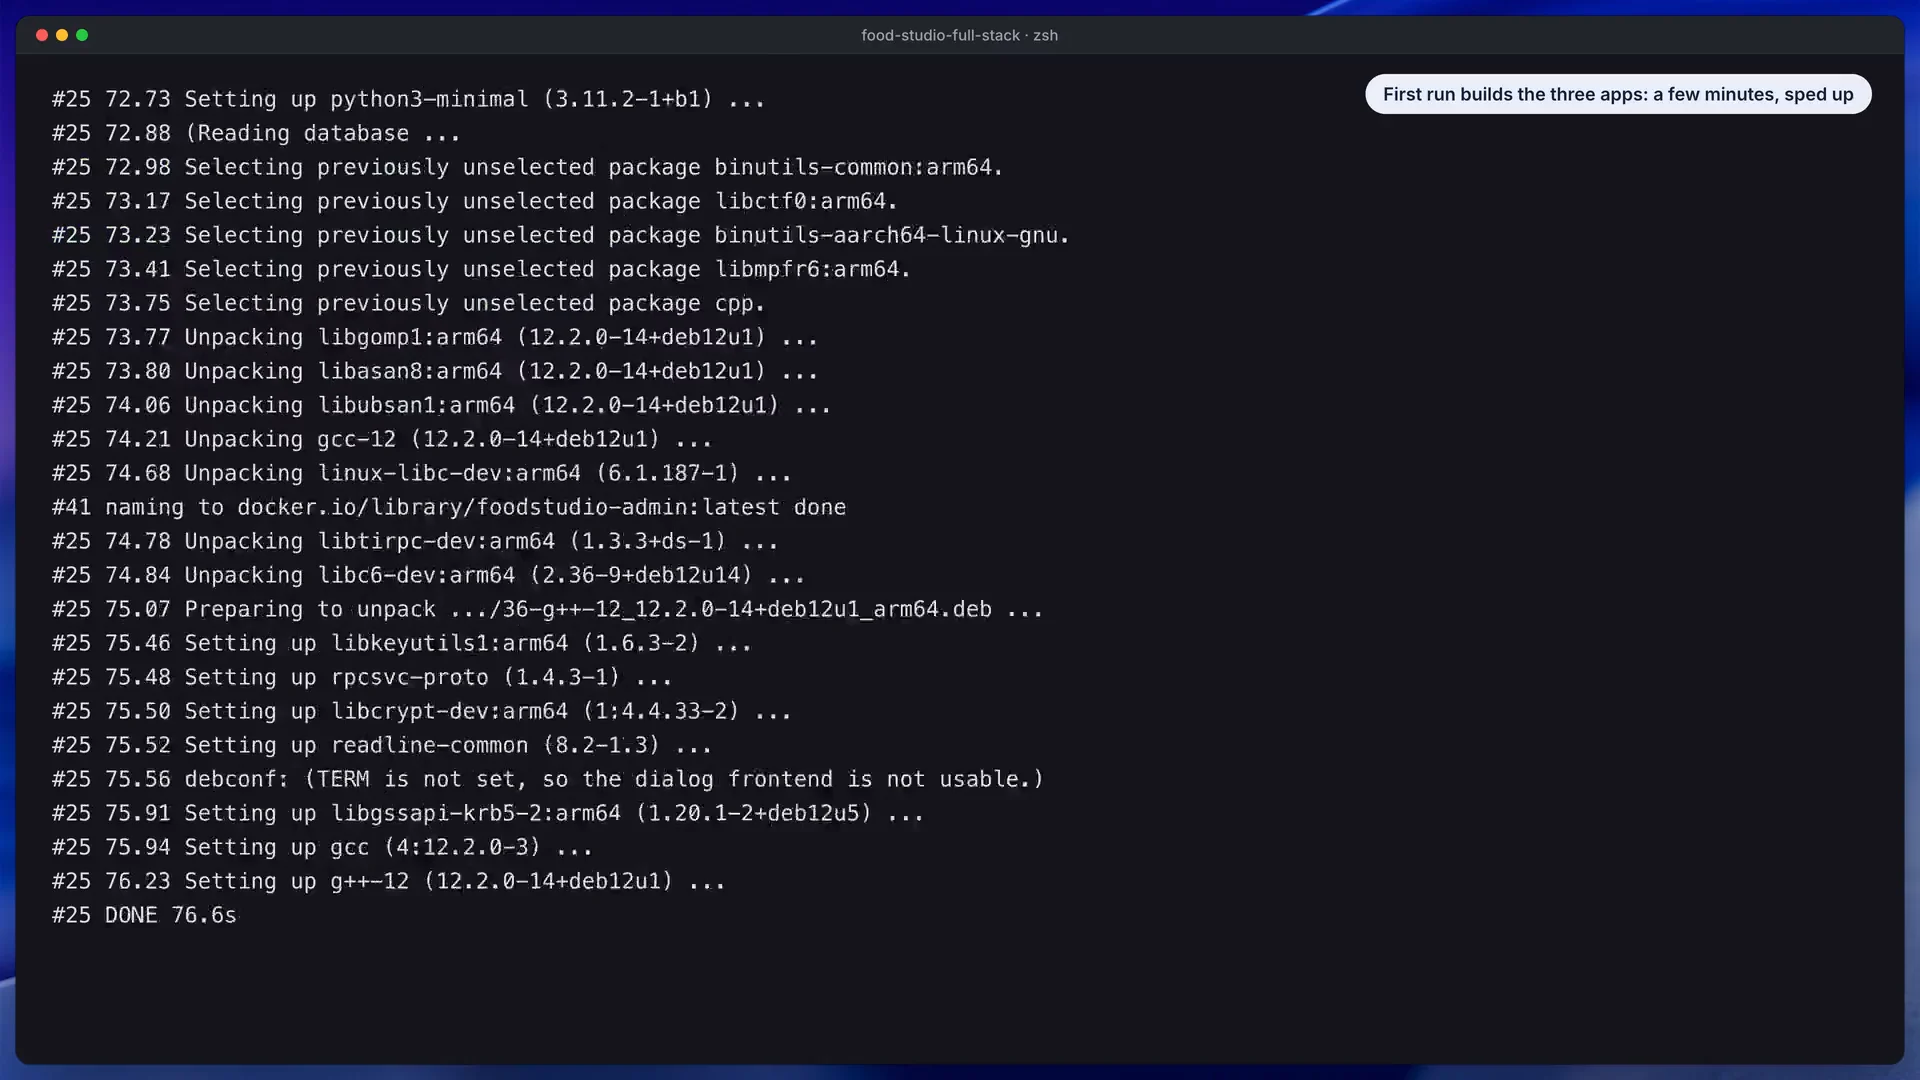
In this still from the install video, look at the single command that starts all three apps together.
If another program already holds one of those ports, put a .env file beside docker-compose.yml with SITE_PORT, ADMIN_PORT or API_PORT set to a free number, then run the command again. The other addresses follow by themselves.
Sign in to the dashboard as the owner with owner@foodstudio.example and the password FoodDemo2026!. The same password works for manager@foodstudio.example and kitchen@foodstudio.example. On the website, the demo customer is sam@foodstudio.example. These are local demo accounts, so plan to change them before the site is public.
Spend twenty minutes here as three different people: order as a guest, move the order along as the owner, then open the kitchen account and see how little it shows.
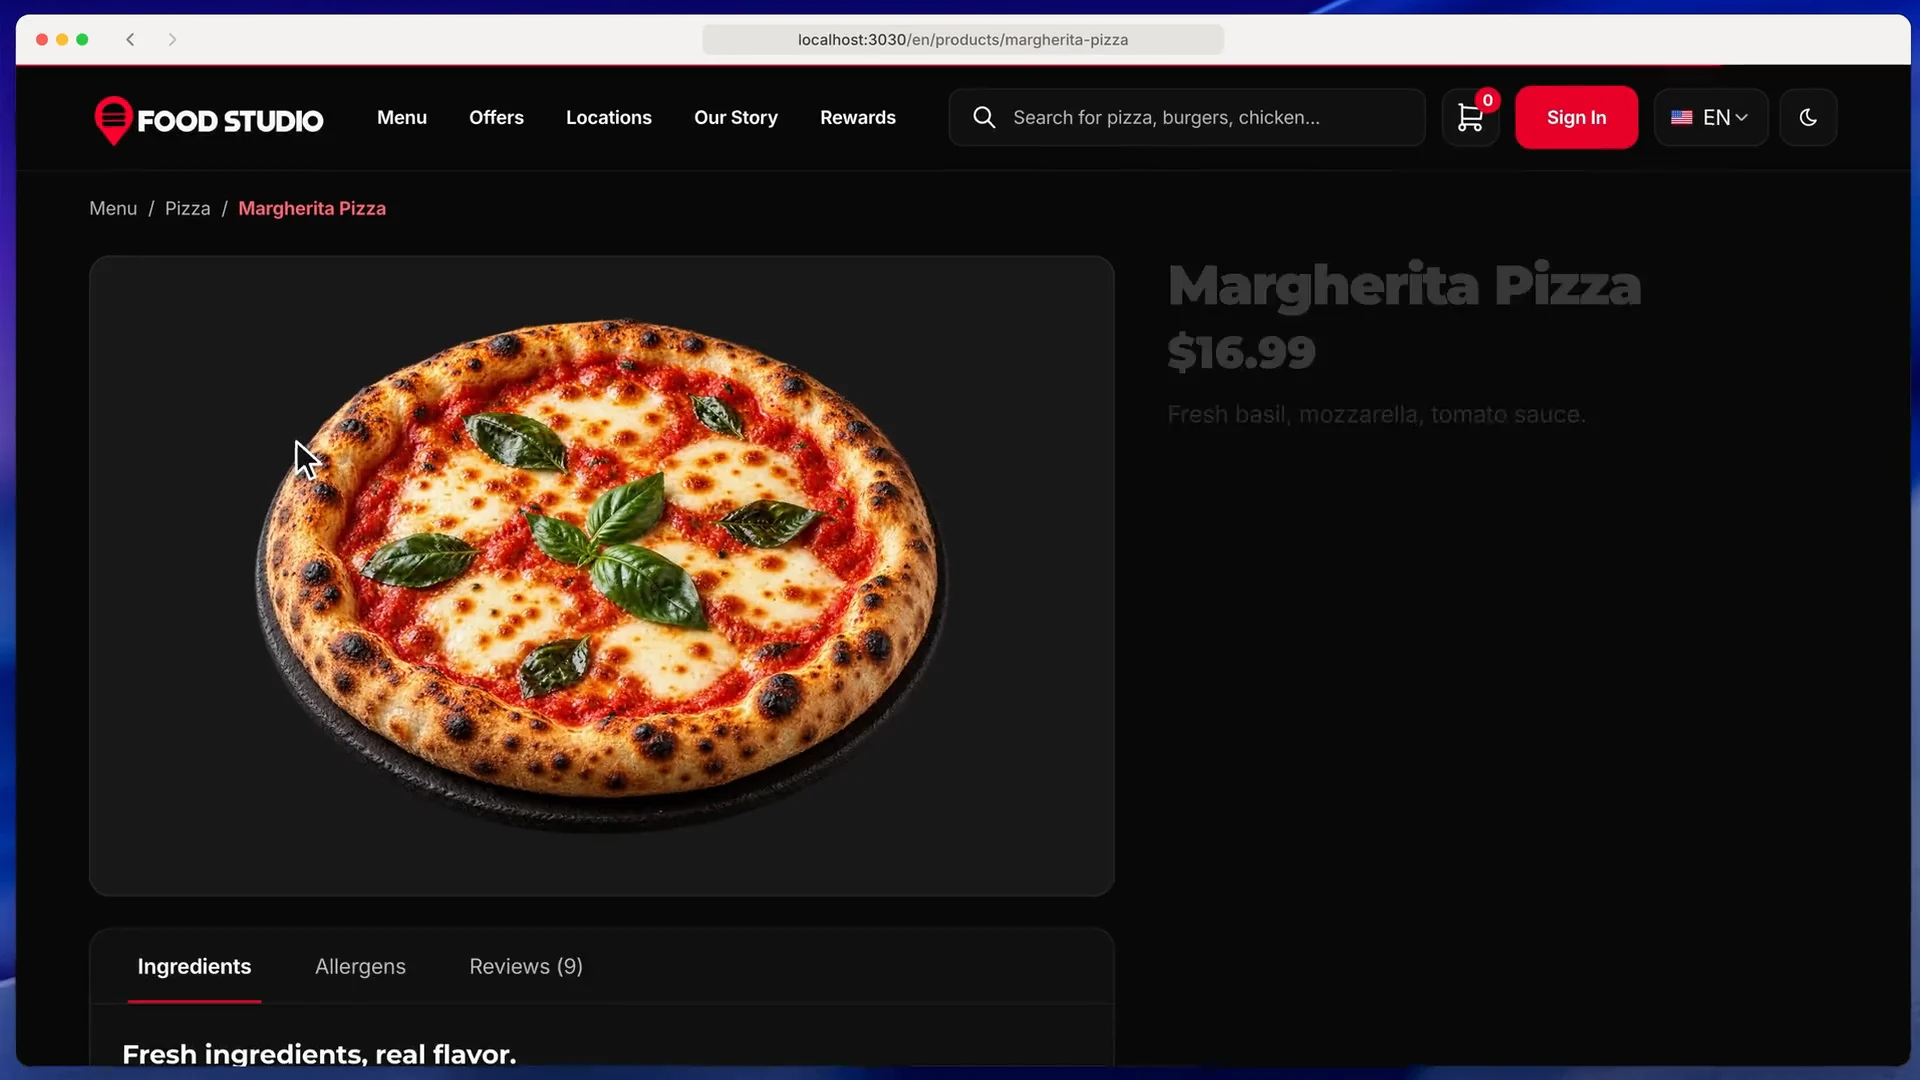
Look at how a dish opens with its quantity and instructions before it goes into the cart.
To stop the apps, press Ctrl+C or run docker compose down. Your data is kept in the food-studio-data volume. Be careful with docker compose down -v: it also deletes that volume, and the next start seeds a fresh demo restaurant over everything you entered.
Check before moving on
All three addresses answer, a guest order reaches the dashboard, and the kitchen account shows no prices.
What usually goes wrong
Docker is not running, so start Docker Desktop and retry. A busy port ends the start with "address already in use": move the app with the port variables above. A start that looks stuck is usually still seeding. Without Docker, an old Node.js (the apps expect 24 or newer) or Yarn 1.22 (run corepack enable) is the usual cause.
Step 3: Set the business details
Do the name and look before the menu, so every later screenshot is the real brand. Three places matter:
storefront/src/config/brand.config.tsholds the names (an English and an Arabic value each), the domain, the contact details and the social links.storefront/src/styles/theme-variables.cssholds the colors, with a light value and a dark value for each. Change--primaryColorand--heading-redand every page follows. Check that text on the new color is still readable in both themes.storefront/public/brand/holds the logo files, one per language and theme.
The restaurant name, its tagline and its support contact are stored as settings, so the owner can change them later from the All settings by key list in the dashboard (Settings, then Restaurant). Also open messages/legal: the privacy policy and terms in the download are written for a fictional restaurant. Replace them with texts that fit Olive Street Kitchen and its country before launch.
Check before moving on
The new name appears in tab titles, the footer and headings in both languages, and text on your brand color stays readable in both themes (the docs ask for a 4.5 to 1 contrast ratio).
What usually goes wrong
A color changed in one theme only, or English copy rewritten without the matching line in ar.json.
Step 4: Add the kitchens, hours and fees
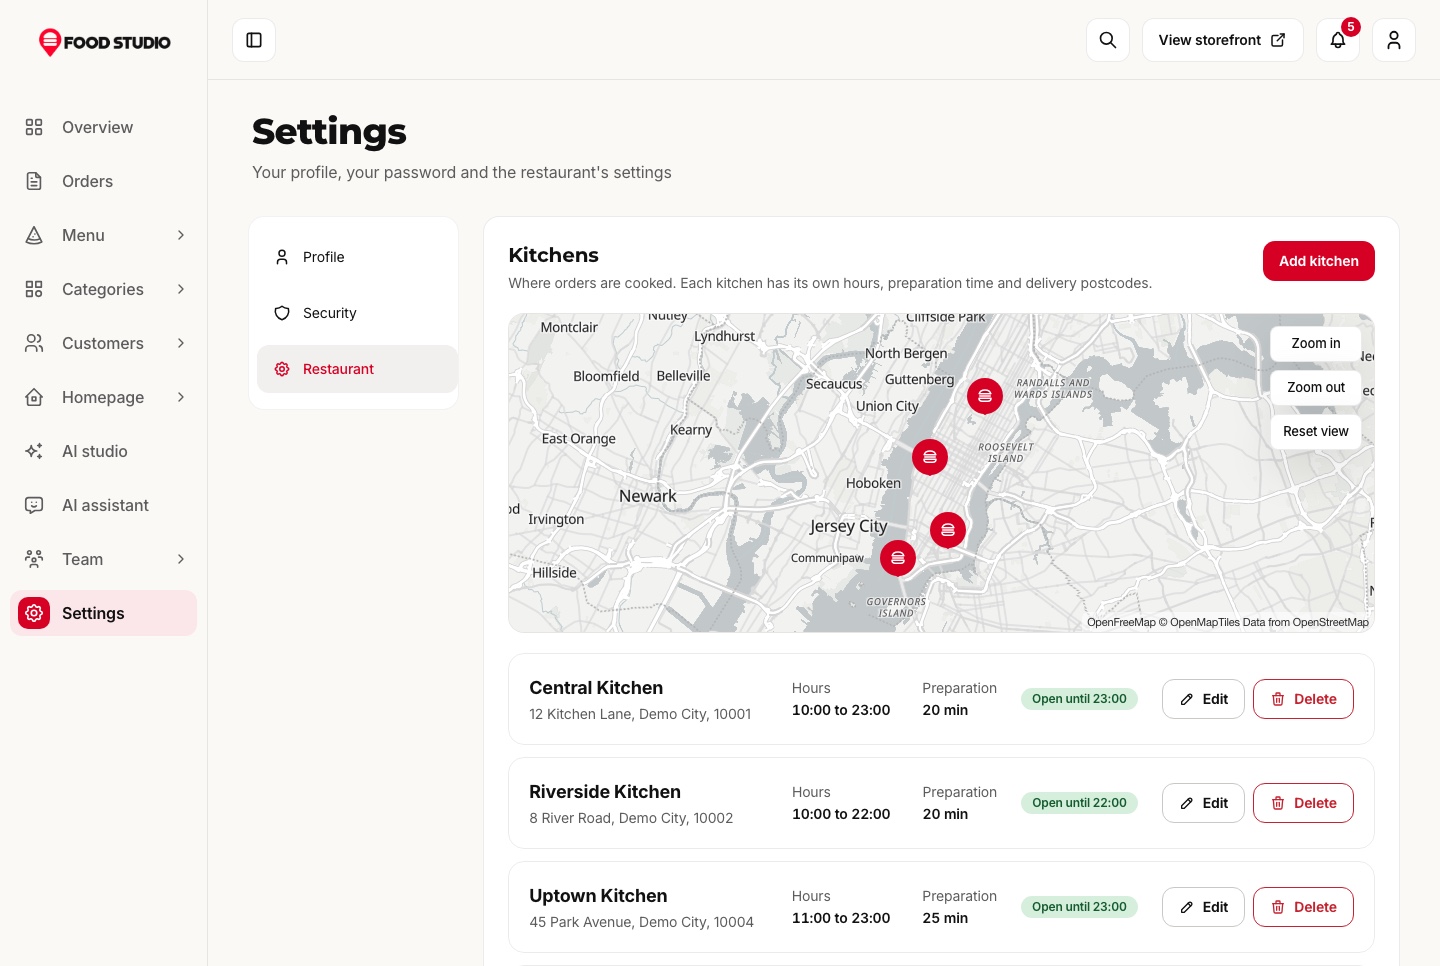
Delivery rules are data, not code. In the dashboard, open Settings and the Restaurant tab. For each kitchen you set the address, the opening hours and time zone, the preparation time, the postcodes it delivers to and a spot on the map. The demo has four kitchens. Olive Street Kitchen keeps two and edits them into the old town and station kitchens, then turns off the rest.
The same tab holds the fees for delivery and pickup, plus the minimum order. The demo starts with a $2.99 delivery fee, free pickup and a $10.00 delivery minimum, so treat those as placeholders for your own numbers. Also look at the service clock. The seed starts on the Demo clock, which holds every kitchen open at 20:55 so you can test at any hour. Switch it to Real before launch, or guests will be told you are open at 3 a.m.
Check before moving on
Use the postcode search on the locations page twice, once with a postcode in a kitchen's list and once outside every list, and read both answers.
What usually goes wrong
Checkout refuses a guest, claiming the kitchen is shut or the delivery address is out of range. The cause is nearly always data: a missing postcode, hours in the wrong time zone, or a basket under the minimum. Fix it in the kitchen's settings.
Step 5: Build the menu in two languages
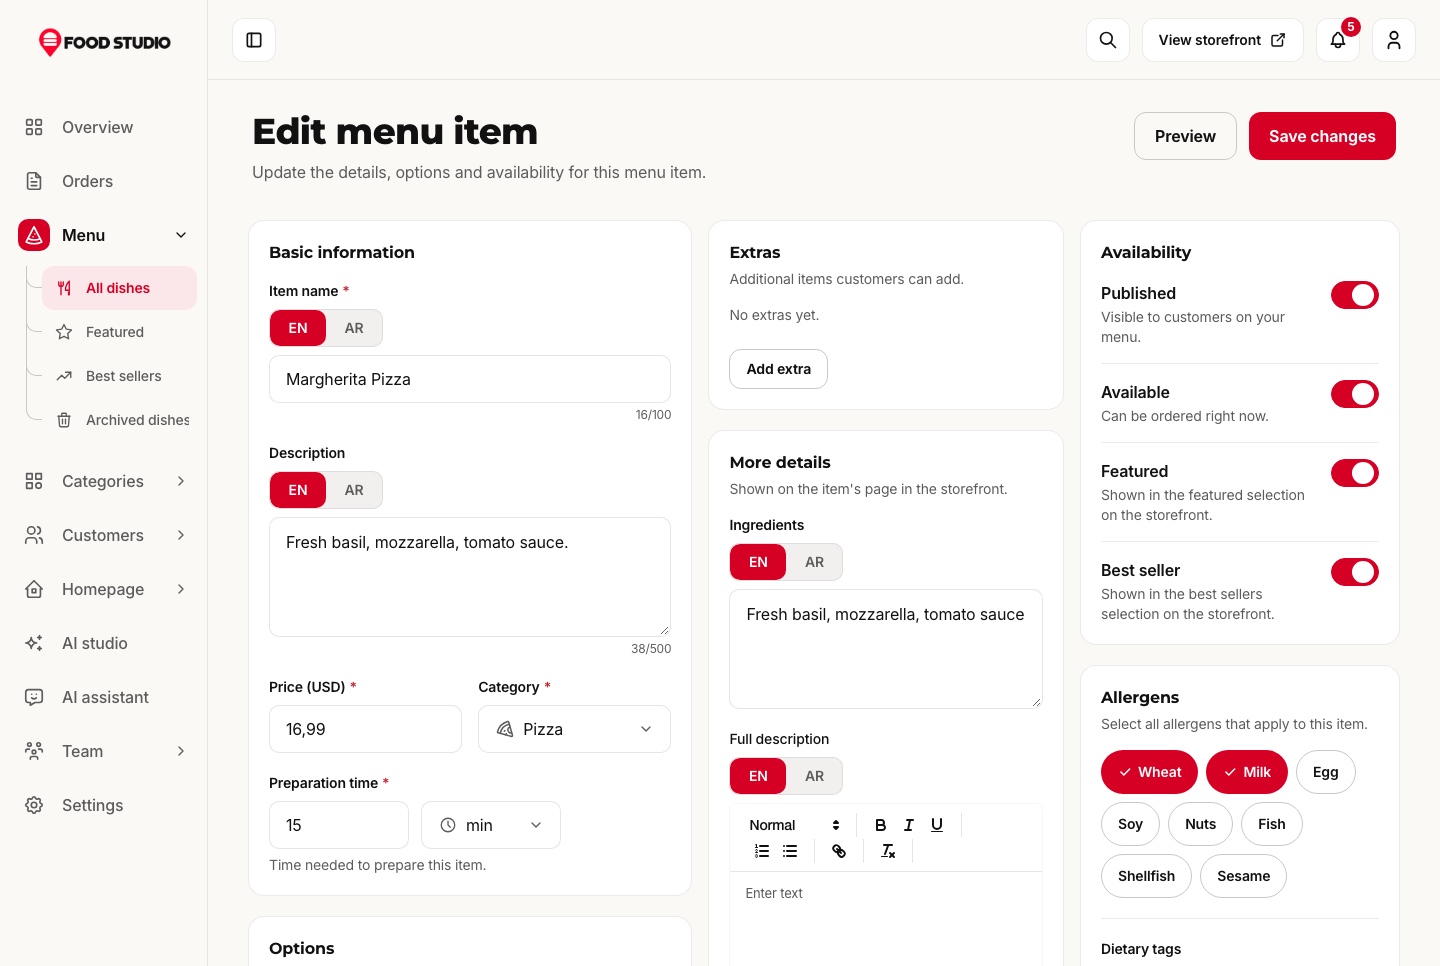
Open Menu in the dashboard. Every dish carries its name, text and ingredient list in both languages, typed next to each other. Add a category, a preparation time, allergens, dietary tags and photos. Extras and sizes are option groups: each group has its own choices, each choice can move the price, and you set how many a guest must and may pick. Optional stock makes the server refuse an order it cannot fill.
For our example we create a few clearly fake dishes first: a lamb plate, a falafel wrap, a hummus starter, a side salad and a lemonade. Then we set up one combo with a choice of main, side and drink. A guest who swaps in a pricier choice pays only the difference. Finish by opening the Homepage page and choosing which of the nine sections to show, in what order, and with which popular dishes.
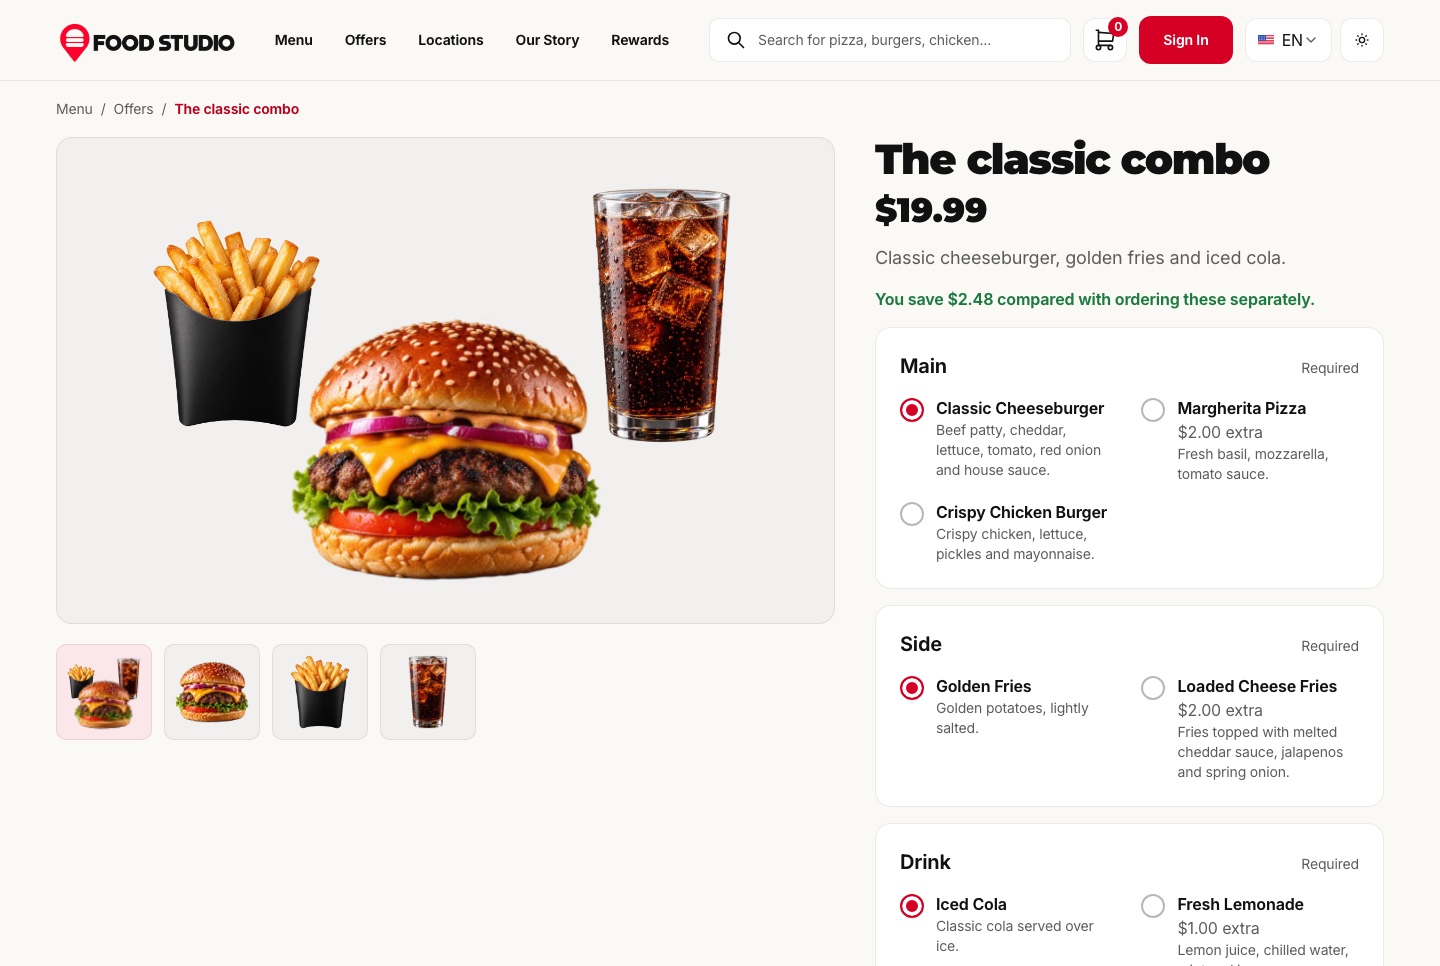
Look at the choice offered for each course and the price shown for the combo as a whole.
Check before moving on
Open one dish in English and in Arabic, mark one dish unavailable (it stays visible and says so), and order the combo with a pricier side to confirm that only the difference is added.
What usually goes wrong
A dish that never appears is unpublished or archived. Photos that fail to load point to PUBLIC_MEDIA_URL, which the seed writes into every picture address, so on a server set it before you seed for the first time.
Step 6: Set up payments in test mode
With no payment provider configured, checkout offers a built-in demo payment that skips real money and marks the order paid. It is good for learning the flow, and it disappears once a real provider is set. Guests pay on Stripe's or PayPal's own page, so your site never sees a card number.
For Stripe, put a test secret key (it starts with sk_test_) in the API's back-end/.env, then add a webhook endpoint in Stripe that points at your API followed by:
/api/payments/webhooks/stripeSubscribe it to checkout.session.completed, checkout.session.expired, charge.refunded and charge.dispute.created, copy its signing secret into STRIPE_WEBHOOK_SECRET, and restart the API. For PayPal, set PAYPAL_CLIENT_ID, PAYPAL_CLIENT_SECRET and PAYPAL_WEBHOOK_ID; PAYPAL_ENV is sandbox by default, which moves no money.
Then place a test order and watch it. An order is saved as unpaid, and it counts as paid only after the API has asked the provider what happened. If a customer abandons the payment page, the API cancels the order later and gives the stock and reward points back. The server prices every order from its own menu, so a browser cannot change a total.
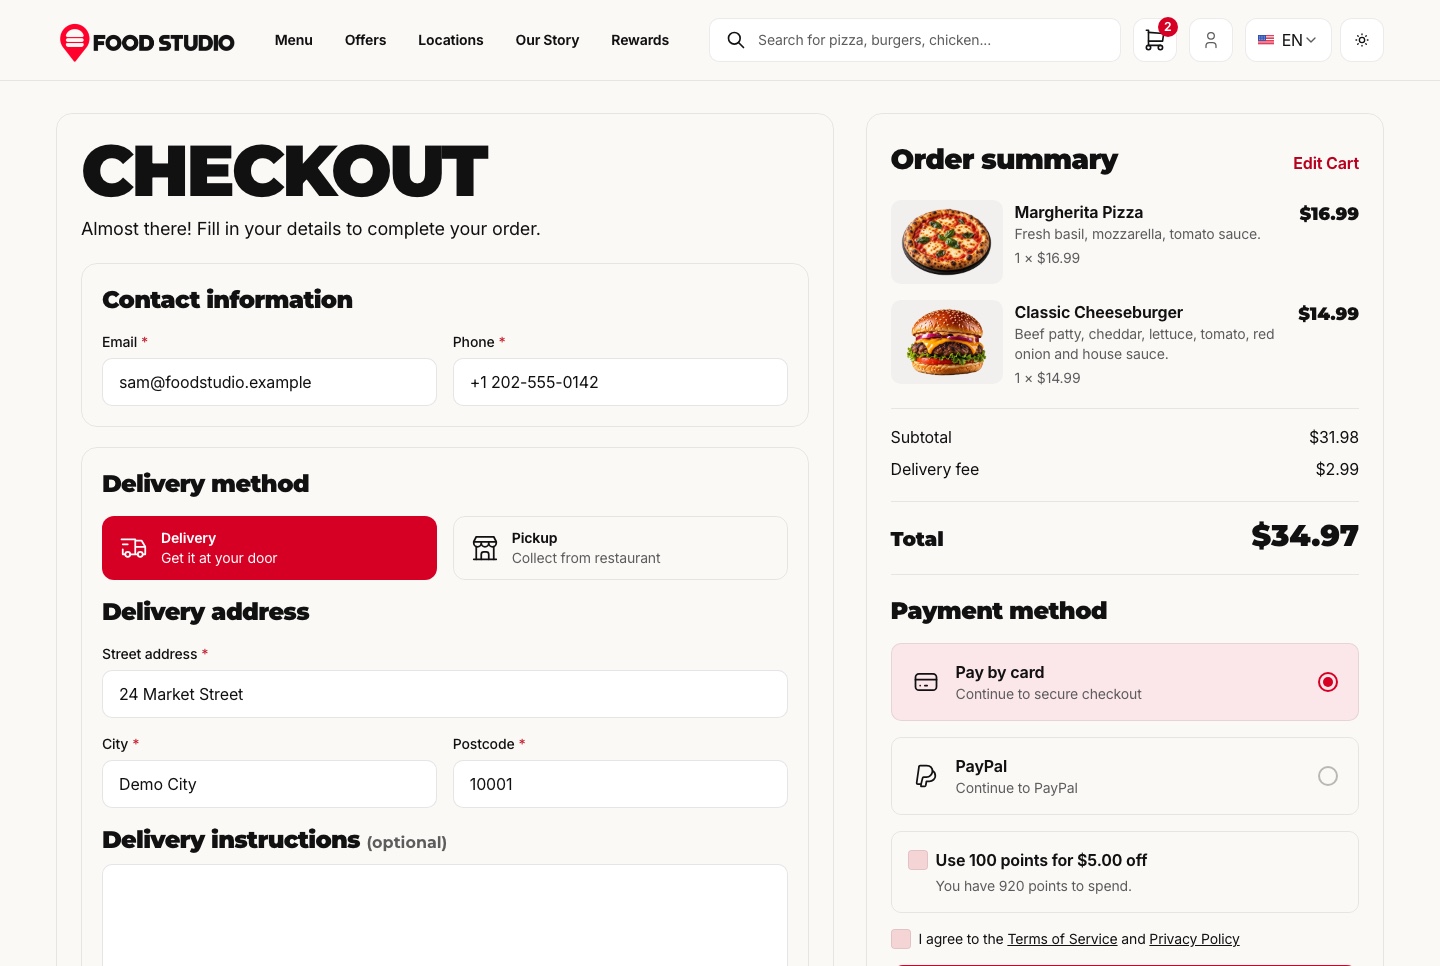
Look at the payment choice on the checkout: the guest is sent to the provider's own page, so no card field appears here.
Check before moving on
An order is saved unpaid, turns paid after the provider confirms, and then shows in the kitchen queue as confirmed.
What usually goes wrong
A paid order stays unpaid. Check the webhook address, the signing secret in the API's .env, a restart of the API, and that API_PUBLIC_URL and STOREFRONT_URL are reachable from the guest's browser. The guest returning to your site never pays an order by itself.
Step 7: Add staff and roles
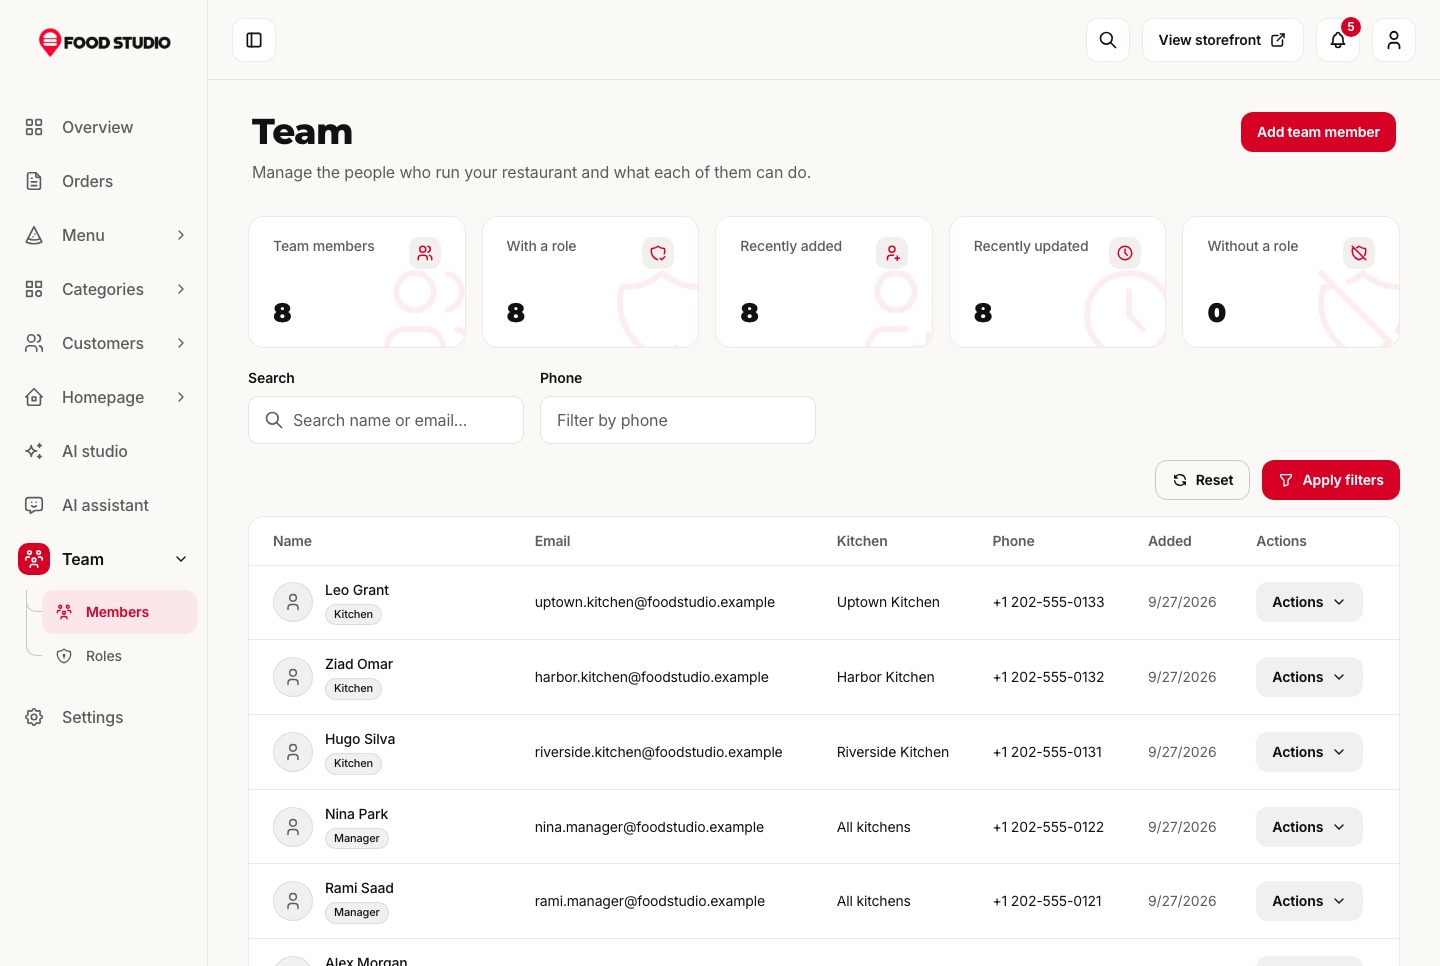
Open Team. The template has three kinds of account. The owner sees everything, including the team and the roles. A manager sees everything except those two. A kitchen account is limited to one kitchen's orders, hides prices and the customer's email, and moves orders from confirmed to preparing to ready.
For Olive Street Kitchen, create one kitchen account for each of the two kitchens, plus a manager. Roles are edited permission by permission, so you can also build a role of your own. Then delete or change the demo accounts. Nobody should be able to sign in with a password printed in a document.
Check before moving on
The kitchen account sees only its own kitchen, with no prices, and can move orders to ready. The manager does not see the Team page.
What usually goes wrong
Only the owner holds the team and role permissions, so a manager cannot fix a role. Edit roles permission by permission when the defaults do not fit.
Step 8: Decide whether you want the AI tools
The AI features are optional, and the restaurant runs without them. With a Google Gemini key in the API's .env, three things switch on: an assistant you can ask about orders, sales and the menu, which answers from your own data, a writer that drafts a dish listing from a prompt or photos, and a photo restyle tool. Google bills for Gemini use under its own pricing, so check the Gemini pricing page before you give a key to a restaurant owner.
One tool costs nothing per photo: removing a dish photo's background runs on your own server with a local model and needs no key. You only add the model file. That is what lets each dish sit cut out on its own tile. If you skip the AI keys, those buttons say they are not connected, and nothing else breaks.
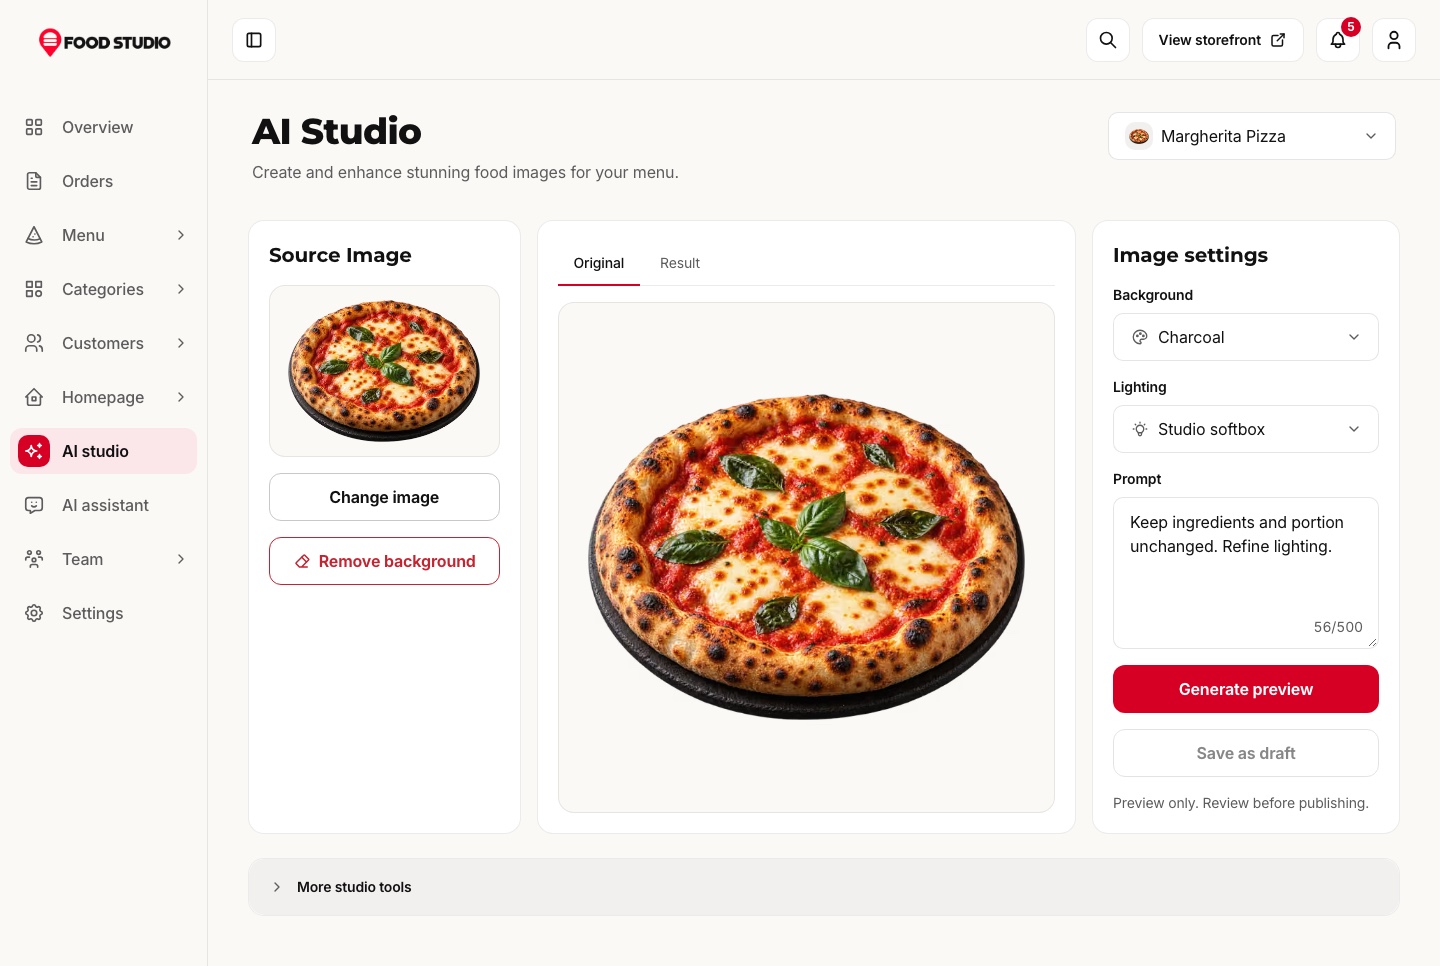
Look at the dish photo before and after restyling, with the original kept for comparison.
Check before moving on
Ask the assistant something you can verify against the overview, such as how many orders came in today, and read the before and after of any change it proposes.
What usually goes wrong
The AI features say they are not connected. Put the key in the API's .env, never in a front end file, and restart the API.
Step 9: Test the whole order, on a phone and in Arabic
Before you touch a domain, run the order from end to end. On your phone, open the site, find a dish, add a combo, pick delivery, enter a postcode inside a kitchen's area, and pay with the test key. Watch the order appear in the dashboard, move it through each status and confirm the guest's tracking page updates. Pickup orders skip the delivery step.
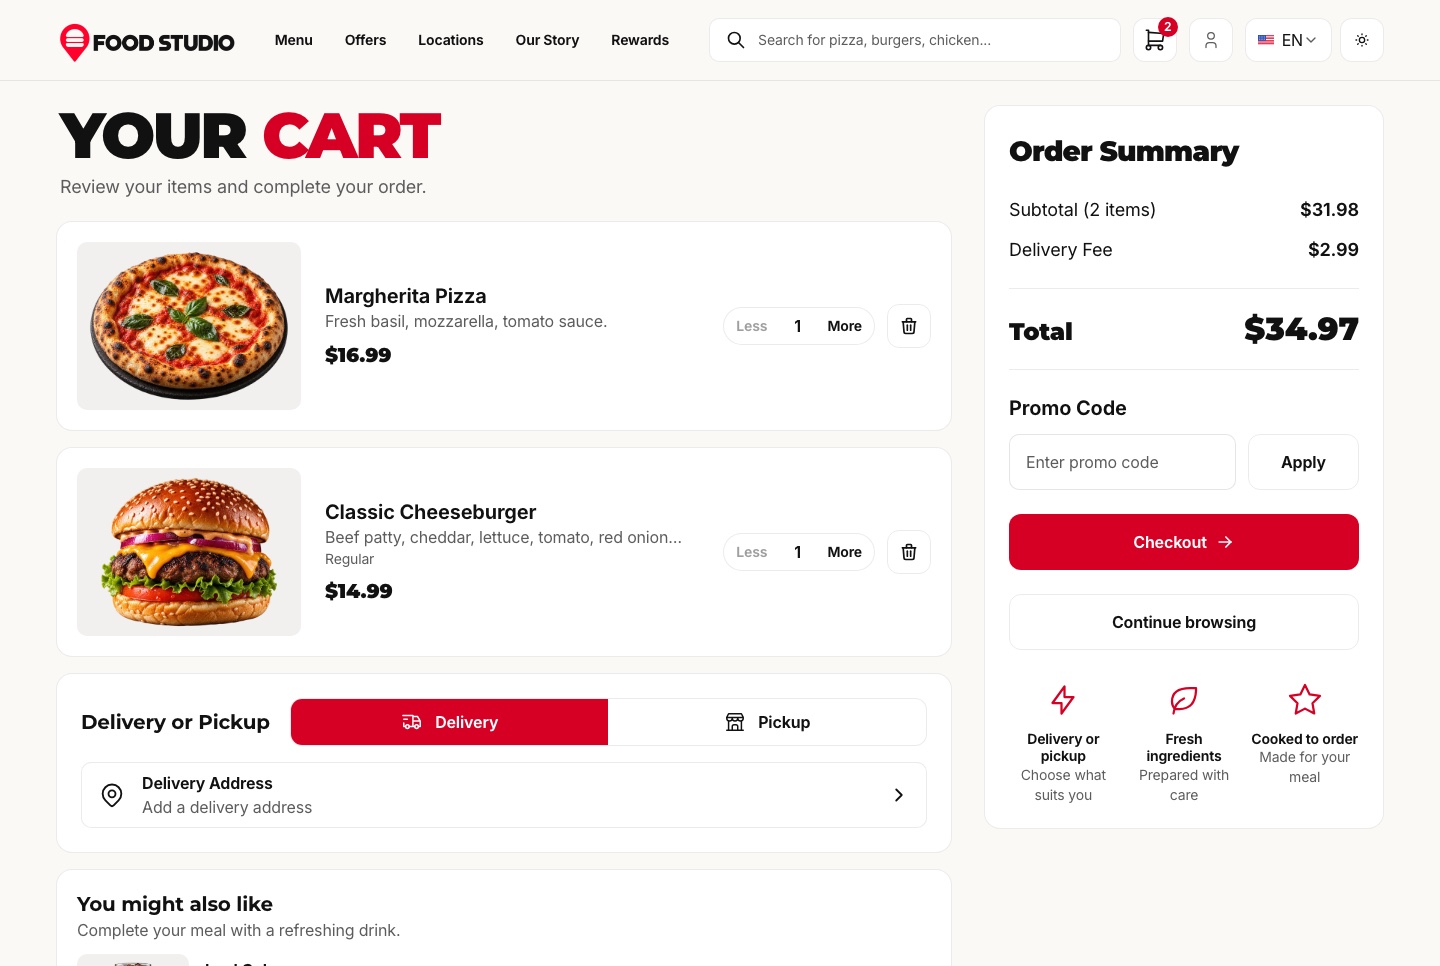
Look at the delivery or pickup switch at the top of the cart, which decides whether the postcode check applies.
Then repeat the run in Arabic at /ar. Check the menu, the cart, the checkout and the dashboard in the right to left layout. Also check an address outside every kitchen's area and an order placed while a kitchen is closed, because those are the cases a real guest will hit on day one.
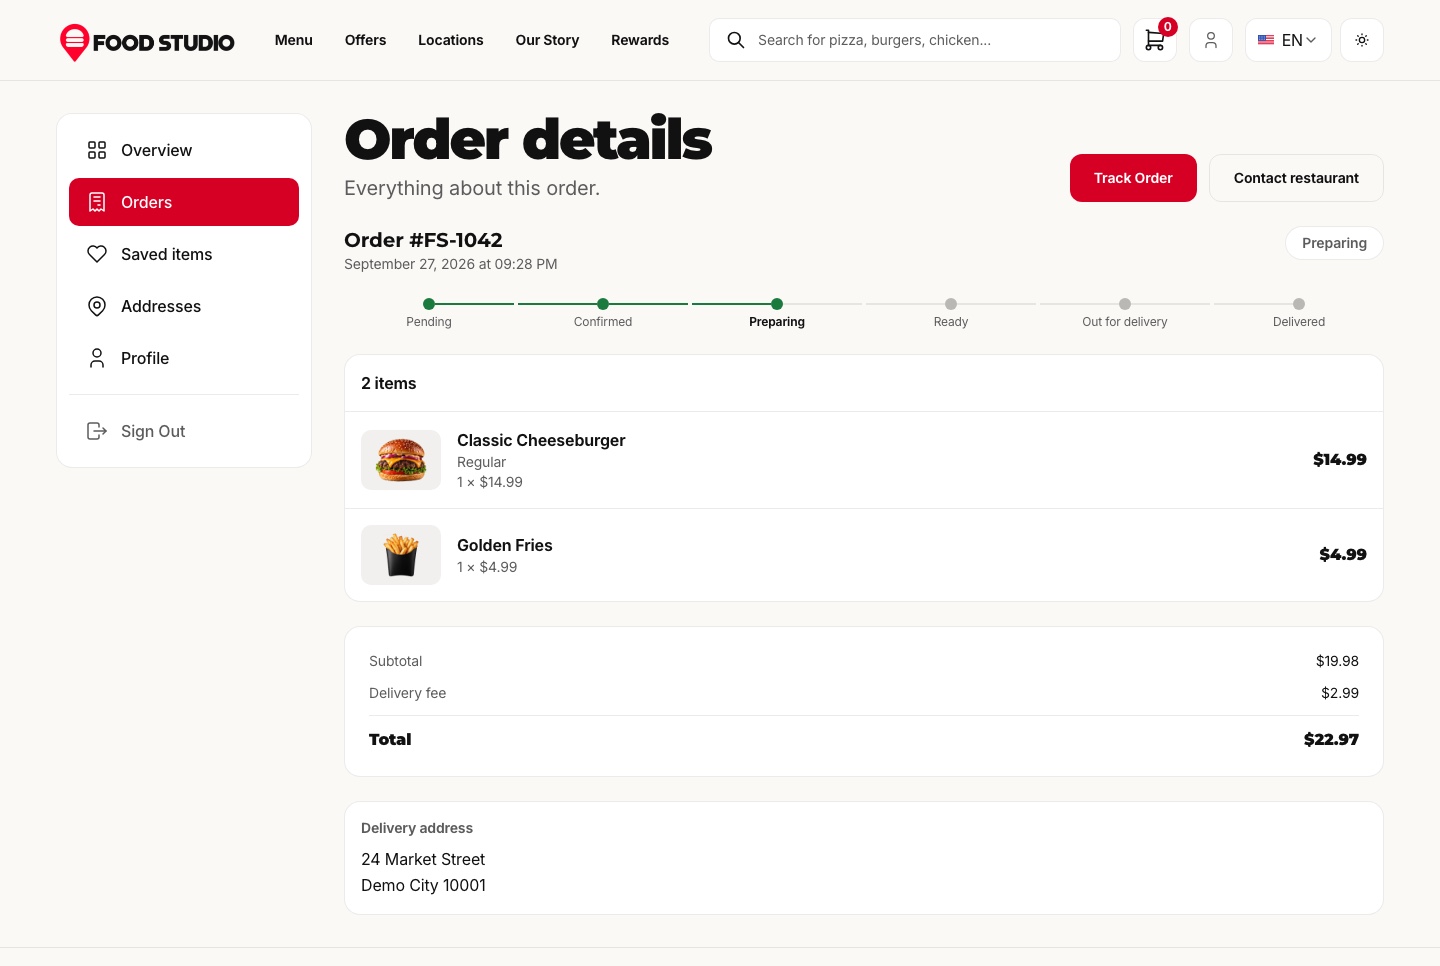
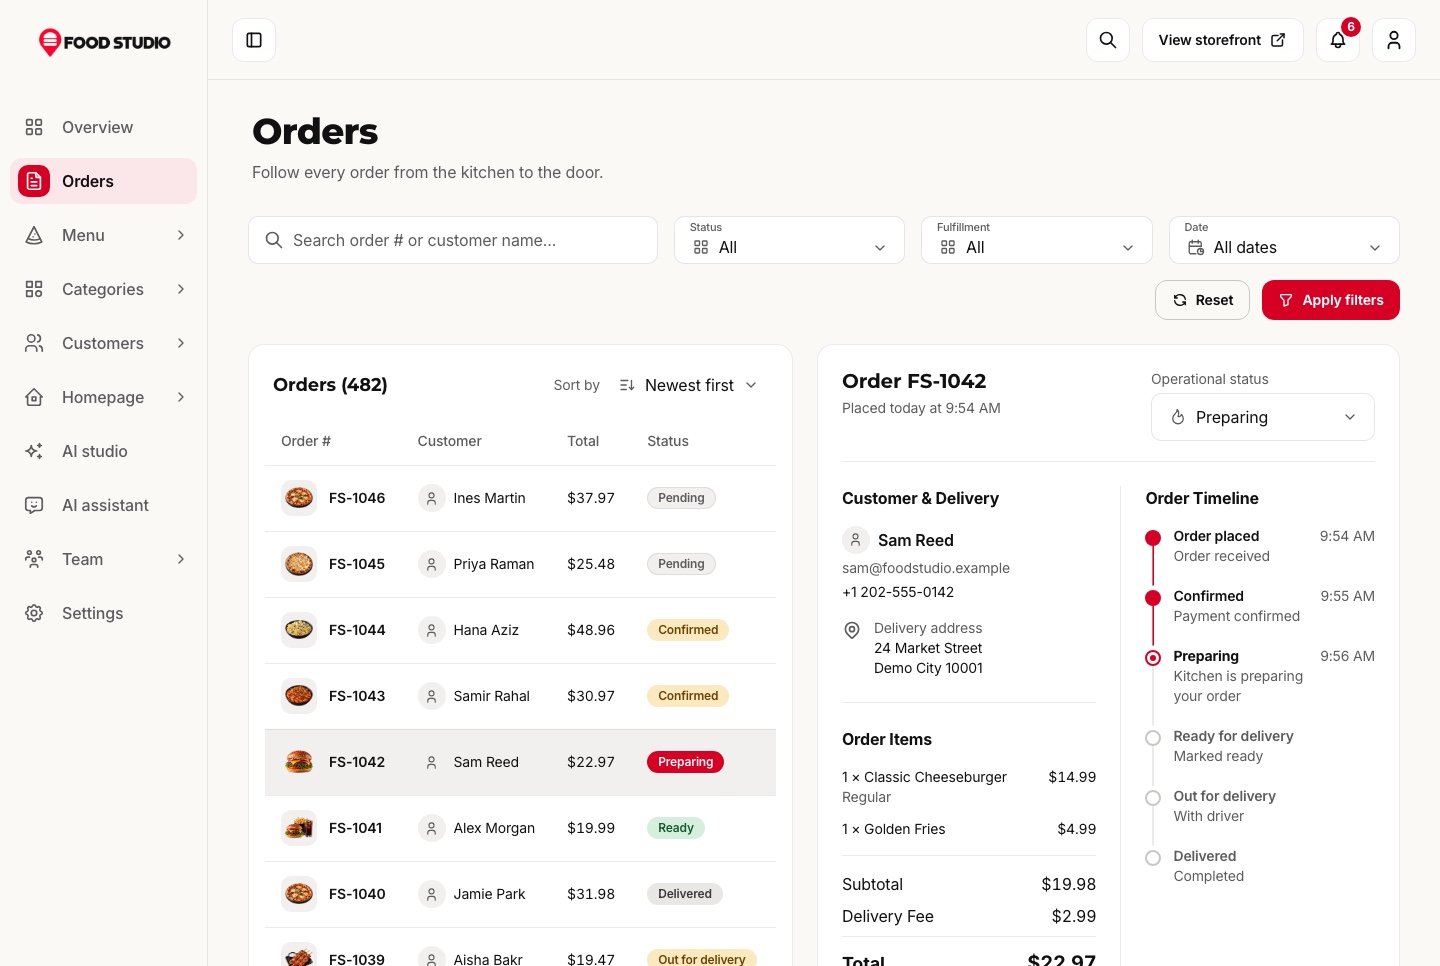
Look at the status line that tells a guest where the order is, which is the page you should refresh while you move the order in the dashboard.
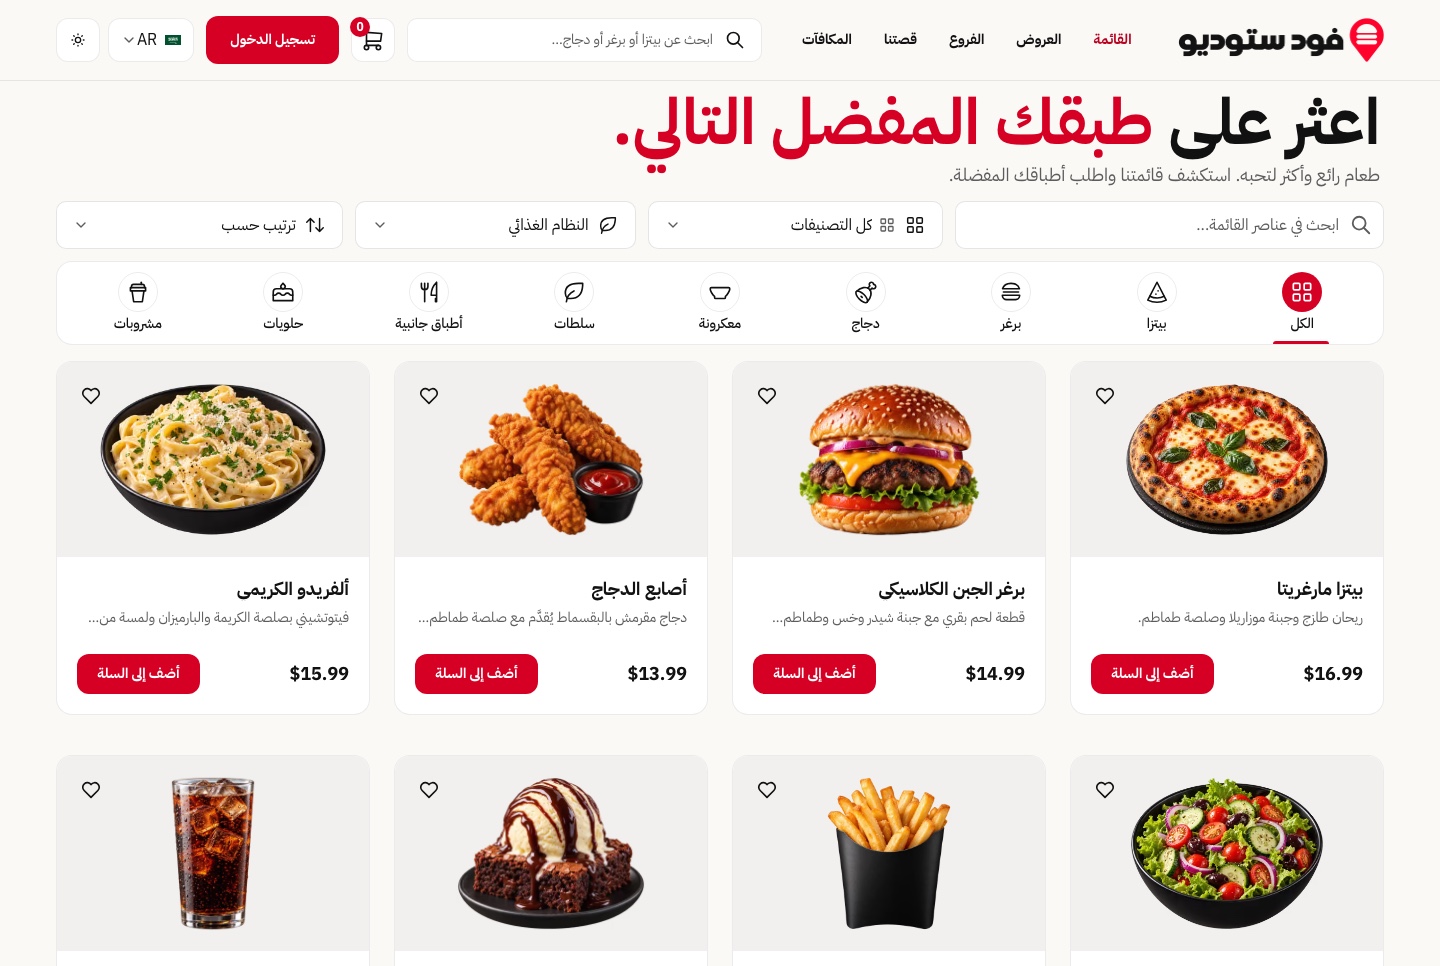
Look at the mirrored layout: filters, tiles and navigation switch sides while prices keep Latin digits.
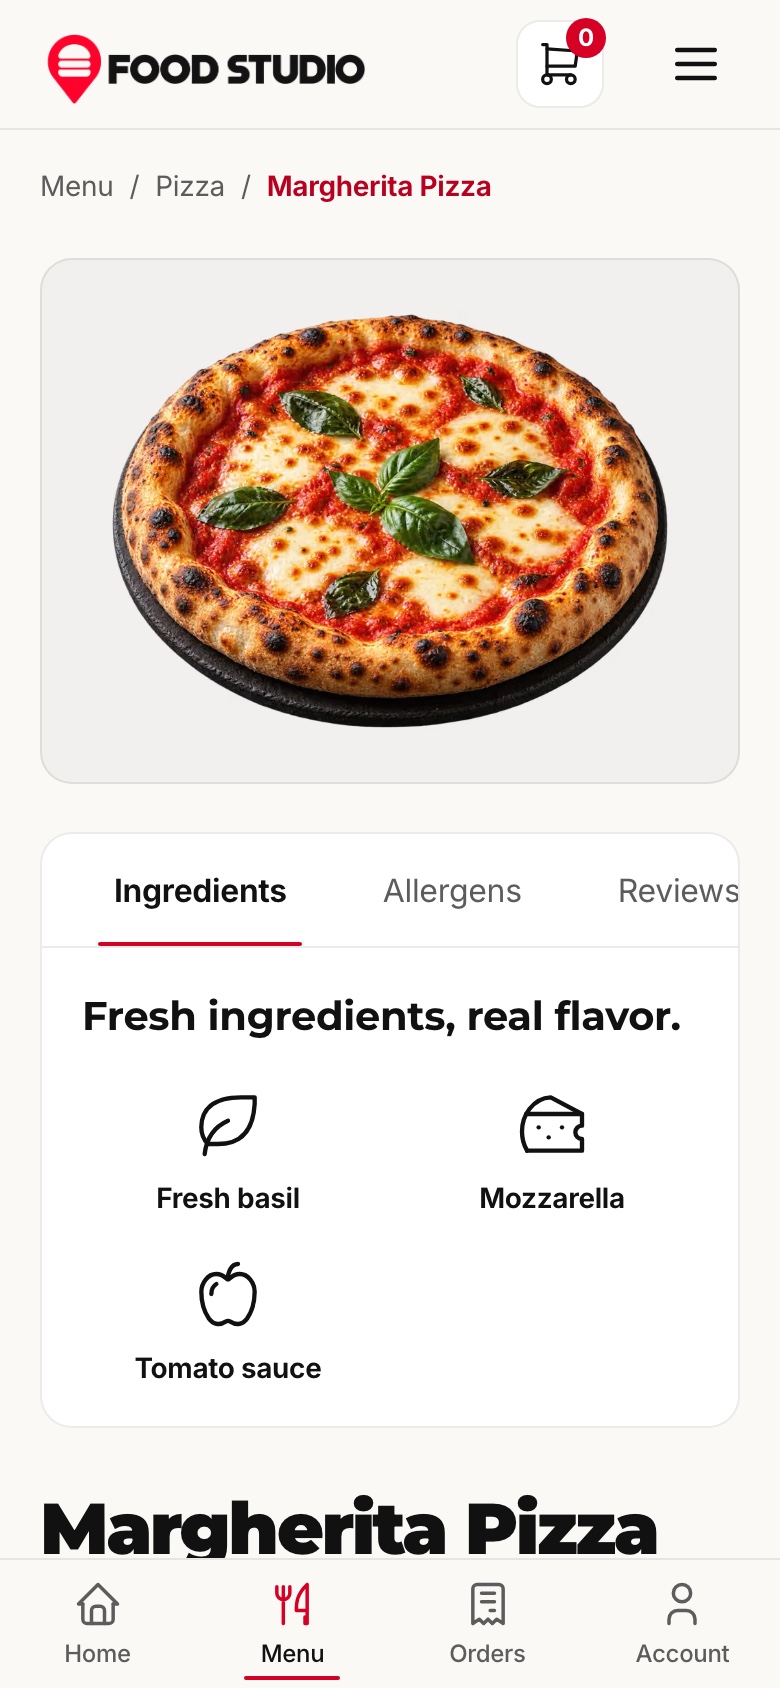
Look at how the dish page fits a narrow screen, with the quantity and the add button within reach of a thumb.
Check before moving on
Run your test list on a phone and a laptop: find a dish, switch delivery to pickup, apply a promo code, pay, and watch the timeline refresh.
What usually goes wrong
New orders show up only after a reload. The dashboard connects to NEXT_PUBLIC_WEBSOCKET_BASE_URL, and the API accepts that connection only from the address in FRONTEND_URL.
Step 10: Go live
Going live means three apps on a Node host, a database, a place for uploads and your real domains. The template keeps its decisions in .env files, so most of the work is setting them correctly:
- Set
NODE_ENV=productionand your ownJWT_SECRET. Generate a fresh secret rather than reusing the example. In production the API will not start withoutCORS_ORIGIN, which lists the website and dashboard addresses, comma separated. - Set
FRONTEND_URL(the dashboard, for live order notifications),STOREFRONT_URL(where payments and password resets send the guest) andAPI_PUBLIC_URL(where Stripe and PayPal return first). - Choose the database: SQLite on a persistent disk, or an empty MySQL database with its connection set in
.envand the seed or table setup run before the first start. - Point uploads at persistent storage: a local folder on a disk that persists, or a bucket (set all five bucket variables).
- In both front ends, set
NEXT_PUBLIC_API_BASE_URLto the live API address including/api, and rebuild. These values are compiled into the code the browser loads, so a change does nothing until the next build. - Switch Stripe and PayPal from test keys to live keys, and add the live webhooks.
Do not use yarn railway:setup as the build command of a live restaurant. It drops every table and seeds again each time it runs, which suits a new environment and ruins a live one. Then place one small real order and refund it from the provider's own dashboard, so you know the whole loop works with real money.
Check before moving on
In a private window, place a guest order and confirm the payment page, the return to your site and the dashboard notification all work.
What usually goes wrong
Empty pages with a CORS message in the console mean the real addresses are missing from CORS_ORIGIN. "Too many attempts" for everyone means TRUST_PROXY is unset behind a proxy. Photos fail when NEXT_PUBLIC_MEDIA_HOSTNAME does not name their host.
Running it day to day
Launch is the start of the work. Here is a normal day and week for the Olive Street Kitchen team, using screens the dashboard already has.
A morning in the dashboard
The manager opens the overview. It opens on the money and the pace of the day (revenue, order count, average order, orders being prepared) set beside yesterday, then charts revenue by hour and category mix, and lists the best sellers and the kitchen queue. It refreshes when an order lands.
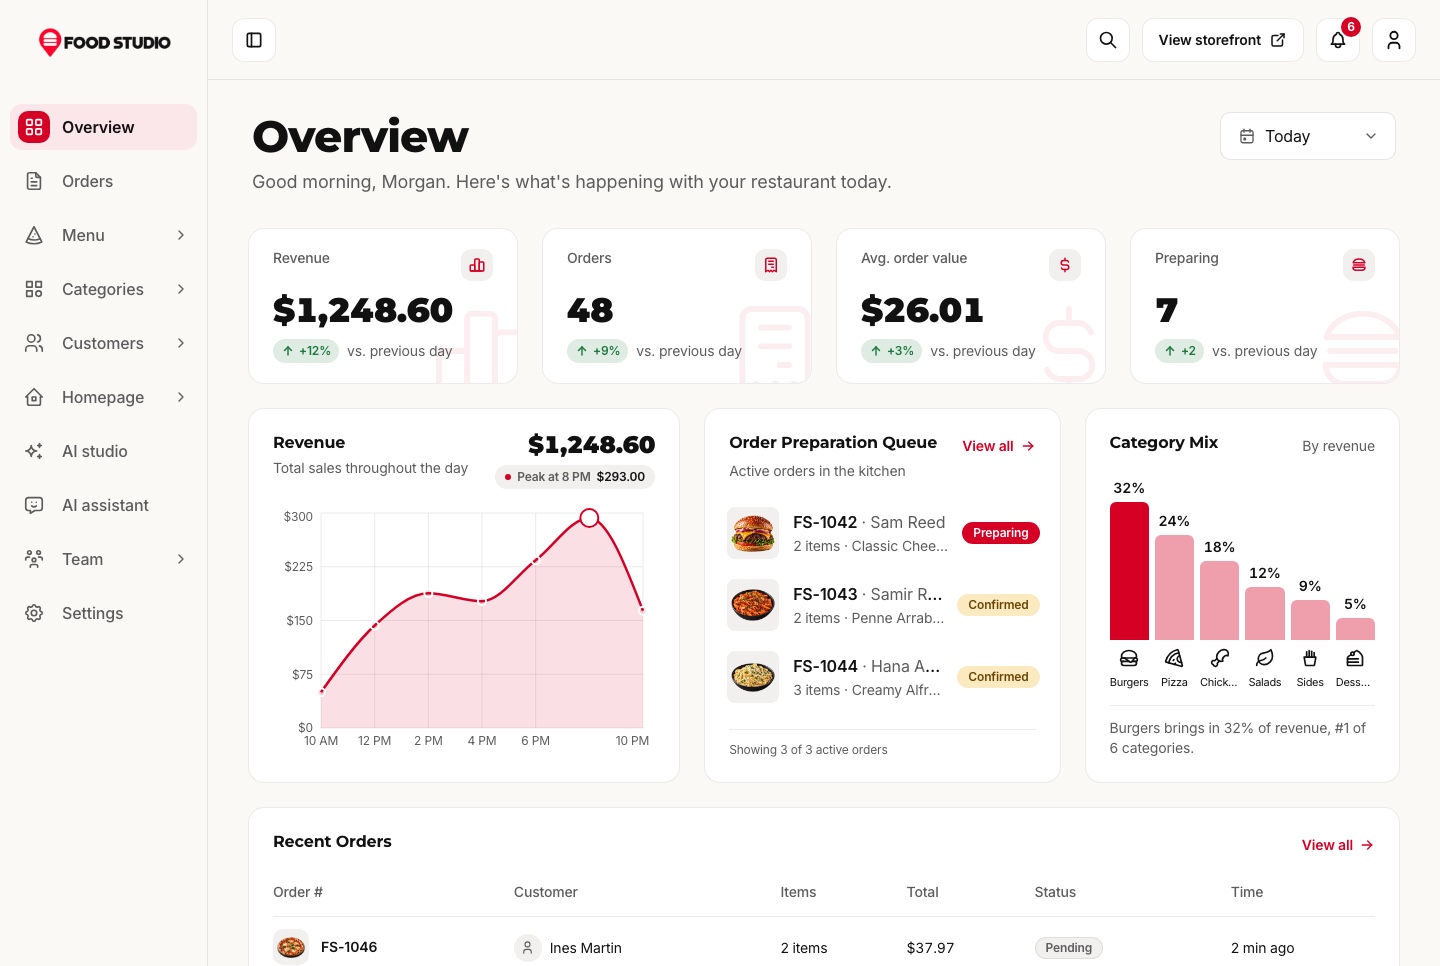
Look at the kitchen queue beside the sales figures: it is the part of the screen the team returns to all day.
Next comes the orders page. Filter by status, delivery or pickup, or date, then open an order for its items, totals and timeline. Only the next sensible status is offered, and a cancellation needs a reason. Check the bell too: it holds contact form messages.
During service
Kitchen staff work from their own account, see confirmed orders for their kitchen without prices, and move them along. When something runs out, the manager switches that dish to unavailable on its menu row, which stops new orders without deleting the dish.
Weekly tasks
- Refresh the home page. Reorder the nine sections, edit the hero in both languages and pick the popular dishes. No code change is needed.
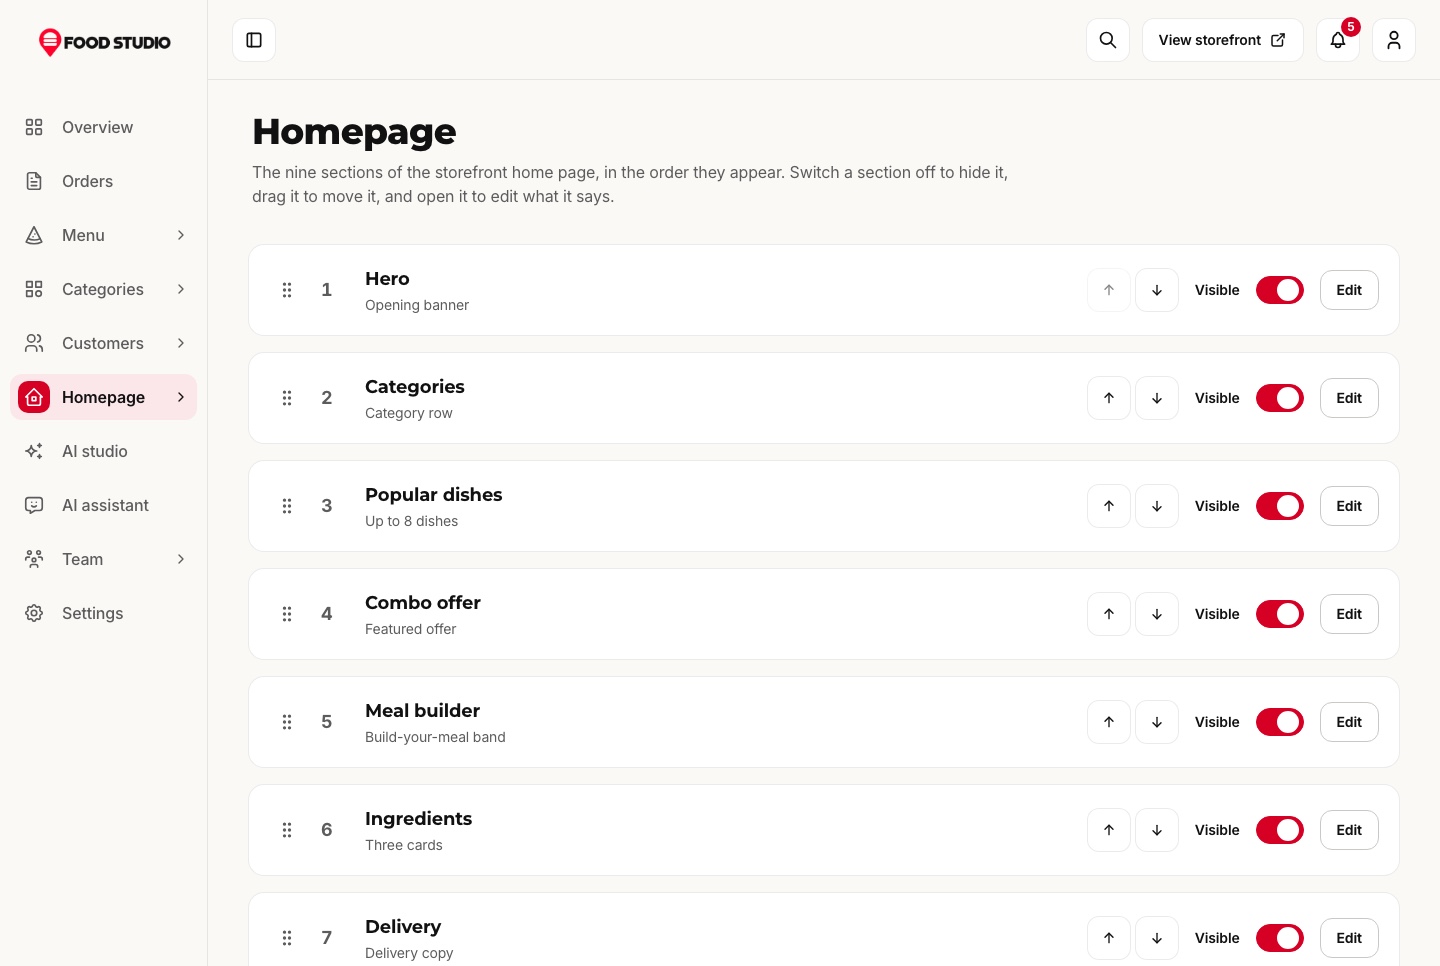
Look at the list of sections with their switches and arrows, which is how the order of the public home page is set.
- Review the menu. Archive what you no longer cook and add the seasonal dish with both languages filled in.
- Ask the assistant. Which dishes sell best this week? It answers from your own data and draws a chart for trends.
- Back up the data. The database and the uploads are the business. Switch on your host's snapshots and keep a copy elsewhere.
An example launch plan, week by week
This is an example schedule for Olive Street Kitchen, not a promise about how long your project takes.
- Week 1, foundations. Run the stack with Docker, take the tour as owner, manager, kitchen and customer, make the decisions above, and start the branding and legal pages.
- Week 2, content. Enter both kitchens, the categories and the first dishes in both languages with photos. Build one combo and arrange the home page.
- Week 3, money and people. Connect Stripe and PayPal in test mode, create the team accounts, and run the full order path on two phones and in Arabic.
- Week 4, go live. Deploy on your domains, switch to live keys, place one small real order, and invite a few regular customers first.
Launch checklist
- The restaurant name, contact details and legal texts are yours, in English and Arabic.
- Every dish on the menu has both languages, allergens and a photo.
- Every kitchen has the correct hours, time zone, postcodes, fees and minimum order.
- The service clock is set to Real, not the demo clock.
- The demo accounts are deleted or have new passwords.
JWT_SECRETis your own, andNODE_ENVisproduction.CORS_ORIGIN,FRONTEND_URL,STOREFRONT_URLandAPI_PUBLIC_URLuse the live addresses.- Both front ends were rebuilt with the live API address.
- Stripe and PayPal use live keys, and their live webhooks deliver.
- The database and the uploads live on storage that survives a restart, and a backup exists.
domain.urlin the brand config is the real address.- One real order was placed, tracked and refunded from the provider's dashboard.
Template, from scratch or a hosted platform
There are three honest ways to put a restaurant online, and none is best for everyone.
A template like this one
You get the source for the website, the dashboard and the API, so you own the result and can change anything. Server-side pricing, delivery checks, order statuses and payment webhooks are already solved. The cost is that you host and maintain it, and anything the template lacks, such as emailed confirmations, is development work.
Building from scratch
You get exactly the product you design. You also build and test every rule yourself: how a combo prices, how a webhook confirms a payment once, how stock is held and released. For most restaurants that is a long road to where a template starts.
A hosted ordering platform
This is the fastest way to start, and someone else runs the servers. The trade-offs are recurring fees, less control over the guest experience, and your order data living on their system. Compare each platform's terms, payment fees and Arabic support before choosing.
What it costs to run
The template is a one-time purchase, from $79 for the ordering website alone. The Full Stack package we used in this example is $179. It includes lifetime support and a commercial license.
Running the restaurant costs more than the template. You pay for:
- Hosting for the API, the website and the dashboard, and a persistent disk or a MySQL database.
- Storage for photo uploads if you choose a bucket such as Cloudflare R2.
- Payment processor fees. Stripe and PayPal charge per their own pricing pages, and the template does not add to them. See Stripe pricing.
- A Google Gemini key, only if you turn on the AI assistant or the photo tools.
- Your own domain.
What costs nothing: local development on SQLite, the demo payment, the map tiles (the template defaults to OpenFreeMap's public styles, which need no key) and background removal on your own server.
What to customise next
- Rewards. The demo gives one point per dollar and takes $5 off for 100 points. Change those numbers in Settings to fit your margins.
- Promo codes. Create a code with a percentage, decide whether it covers the menu or the whole order, and whether it combines with rewards.
- The home page. Reorder the nine sections to match a campaign, and rewrite the hero in both languages without a code change.
Common mistakes
Changing a front end's .env and expecting it to apply
Every NEXT_PUBLIC_* value is compiled into the page at build time. If the site still calls the old API after you edit the file, rebuild it. With Docker Compose, put the value in the .env beside docker-compose.yml and run docker compose up --build.
Leaving the demo clock on
The seed keeps every kitchen open at the same fixed time so you can test at midnight. If you forget to switch to the real clock, guests can order from a closed kitchen.
Forgetting CORS on the live domains
If the live pages stay empty and the browser console mentions CORS, the API does not know your domain yet. Add both front end addresses to CORS_ORIGIN and restart the API.
Assuming features that are not included
The template does not send order confirmation emails, take orders for a later time, add tips or tax lines, or handle cash on delivery. Password reset mail goes through Resend if you configure it. If Olive Street Kitchen needs any of the others, budget development time for them.
FAQ
How do I build an online ordering system for a restaurant with Next.js?
Start from a template that already includes the hard parts, then configure it. You need a customer website, a staff dashboard and an API that prices orders and talks to a payment provider. This guide walks through the steps with Food Studio: run it, brand it, enter kitchens and the menu, test payments, add staff and deploy.
Do I need a backend?
Yes. Prices, stock, order statuses and payment confirmation must be decided on a server, not in the browser. The template ships a NestJS API with TypeORM for that, and the website and dashboard read everything from it.
Can I use it for client projects?
Yes. It comes with a commercial license for unlimited projects, which covers agencies building restaurant sites. Read the license in the documentation for the exact terms.
Does it support Arabic and RTL?
Yes. The website, the dashboard and the API run in English and Arabic. Arabic pages mirror to right to left, and dishes are stored with a name and description in both languages.
Can I run several kitchens?
Yes. Each kitchen has its own hours, time zone, delivery postcodes and staff accounts. The website tells a guest if a kitchen delivers to their postcode, is closed, or if another kitchen can take the order.
Which payment providers work?
Stripe Checkout and PayPal. Both take the guest to their own page and confirm the order through a signed webhook. You use your own accounts, and their fees are not part of the template price.
Do I need Docker?
No, but it is the quickest start. Without Docker you need Node.js 24 or newer and Yarn through Corepack, and you run each app with yarn dev. The API needs no database server, because it uses SQLite by default.
Can guests order without an account?
Yes. Guests can check out with a name and an email, and track the order by its number and that email. An account adds reward points, saved dishes and addresses, and a reorder button.
Does it send order confirmation emails?
No. The template does not send order confirmation emails. Guests see the order on the confirmation and tracking pages, and the dashboard notifies the team. Password reset mail works through Resend once you add its keys.
Can I use MySQL instead of SQLite?
Yes, as a configuration change. Create an empty database, set the driver and connection in the API's .env, and run the seed or the table setup before the first start in production.
Try it yourself
Order from the live ordering website, then open the staff dashboard demo to see the other side. Read the Food Studio documentation for every setting in this guide, or see the product page for the packages. More options are in the restaurant template category. Food Studio is also one of ten templates in the Next.js Templates Bundle.
You might also like
How to Build a Vacation Rental Booking Website with Next.js
Build a vacation rental website with direct booking in Next.js: add stays, protect the calendar, set up Stripe and PayPal, and go live.
How to Build a Real Estate Agency Website in Next.js
Build a real estate agency website in Next.js with property listings, viewing requests and an admin dashboard: setup, staging, roles and launch.
How to Build an Online Fitness Coaching App with Next.js
Build an online coaching platform with client rosters, assigned workouts and weekly check-ins using Next.js and NestJS. A worked example, step by step.
